Before looking at this thread, it is recommended that you have first looked at the original Ship Editor Tutorial and are well familiarized with the Ship Editor.
Introduction[ | ]
Before we delve into the power of CoffeeScript, we need to make a slight change to how we call our model first (not needed for few limited power like array extensions).
Instead of return model = at the beginning of the ship code, we will simply change that to model = and at the very end of the ship code we will put return model;. This won't affect how we normally use the ship editor and simply allows for extra code to work after the ship code.
As a reminder, here are all available properties of the ship structures (bodies / wings / tori):
  bodies:
    [body_name]:
      section_segments: n #or [n...array.length] required
      offset: #required with children
        x: n
        y: n
        z: n
      position: #required with children
        x: [n...array.length]
        y: [n...array.length]
        z: [n...array.length]
      width: [n...array.length] #required
      height: [n...array.length] #required
      texture: n #or [n...array.length] optional
      angle: n #optional
      vertical: true/false #optional
      propeller: true/false #optional
      laser: #optional with required children
        damage: [min,max]
        rate: n
        speed: [min,max]
        number: n
        angle: n #optional
        type: n #optional
        error: n #optional
        recoil: n #optional
  wings:
    [wing_name]:
      doubleside: true/false
      offset: #required with children
        x: n
        y: n
        z: n
      length: [n...array.length] #required
      width: [n...array.length] #required
      angle: [n...array.length] #required
      position: [n...array.length] #required
      texture: n #or [n...array.length] optional
      bump: #optional with required children
        position: n
        size: n
  tori:
    [torus_name]:
      radius: n #required
      segments: n #or [n...array.length] required
      section_segments: n #or [n...array.length] required
      offset: #required with children
        x: n
        y: n
        z: n
      position: #required with children
        x: [n...array.length]
        y: [n...array.length]
        z: [n...array.length]
      width: [n...array.length] #required
      height: [n...array.length] #required
      texture: n #or [n...array.length] optional
Reset Points[ | ]
Reset points allow us to start a new object from the same body (well, technically not but at least appear to).
A reset point is when 2 joints next to each other in the width & height arrays are 0. The location of these 2 joints however will be in different places, giving the illusion of starting another object elsewhere from the same body. (In reality, the object draws an invisible 0 width and height line between the two joints.)
For example:
    spikes:
      section_segments: 4
      offset:
        x: 0
        y: 0
        z: 0
      position:
        x: [-10,-18,-18,-15,-24,-24,-20,-32,-32]
        y: [-30,20,20,-23,30,30,-12,40,40]
        z: [0,0,0,0,0,0,0,0,0]
      width: [0,1.5,0,0,1.5,0,0,2,0]
      height: [0,1,0,0,1,0,0,1,0]
      texture: [1]
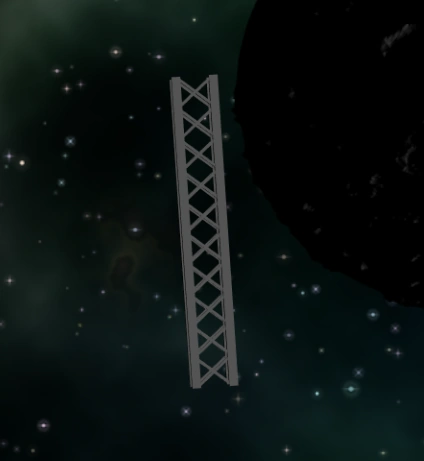
Here's a more extreme example of using reset points in this construction pylon. Yes, this is all one body.
Functions[ | ]
Functions are prepared blocks of code that sit before our ship code, which can then be called later on. For our purposes, we will be using them to make bodies.
To create a function, all we need is the name of the function followed by brackets, and then the magic -> and there's your function.
It should look something like this:
myFunction = () ->
But right now it has no use.
So lets start by making it create a body for us. For this example I will be using a simple ring generator function, but before we do, I will post useful array extensions in which the function partly relies on.
Credit for these array extensions go out to 123 Notus.
Array::add = (mod) -> @map (val) -> val + mod
Array::mult = (mod) -> @map (val) -> val * mod
Array::div = (mod) -> @map (val) -> val / mod
Array::step = (step) -> i for i in @ by step
Array::refill = (val, len) -> val for i in (
  if len? then [0...len]
  else if @length == 1 then [0...@[0]]
  else @
)
for key of Array::
  Object.defineProperty Array::, key, enumerable: false
The top block of code are the functions themselves, but due to an error in Ship Editor, the mod export will not work. This is where the fix comes in the second block.
We use them after arrays as follows:
[array.length].add(n)
[array.length].mult(n)
[array.length].div(n)
[array.length].step(n)
[array.length].refill(n)
More details can be found there: Array extending in Starblast Ship Editor.
Back to our function:
ringGen = (xx, yy, zz, segments, length, width, thick, thicc, vert, tx, angle) ->
  return k =
    section_segments: segments
    offset:
      x: xx
      y: yy
      z: zz
    position:
      x: [0,0,0,0,0,0,0,0,0,0,0,0,0]
      y: [-2.25,2.25,2.25,-2.25,-2.25].mult(thick+thicc)
      z: [0,0,0,0,0,0,0,0,0,0,0,0,0]
    width: [width+2.5*thick,width+2.5*thick,width-2.5*thick,width-2.5*thick,width+2.5*thick]
    height: [length+2.5*thick,length+2.5*thick,length-2.5*thick,length-2.5*thick,length+2.5*thick]
    vertical: vert
    texture: tx
    angle: angle
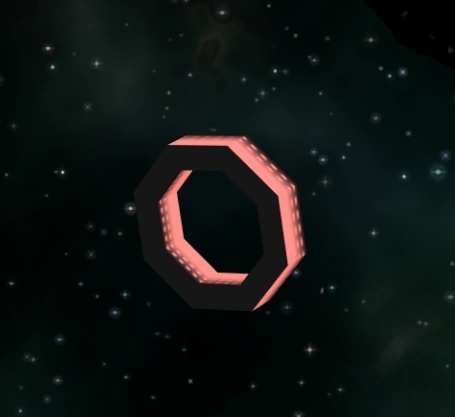
As we can see, the function now has internal variables assigned to it which we have mapped to the corresponding properties of our body. We call it under bodies in our ship code as follows:
mainEnginering1: ringGen(0,40,0,8,14,14,1,0.5,false,[17,4,17,4],0)
And it should look something like this:
Functions like this are useful for creating complex bodies. It means we can just take a pre-existing base and call it from 1 line rather than manually create the whole thing many times to where the code takes 500 lines worth of bodies and all their properties. It should be noted that functions don't need to be this complex. It's entirely possible to simply use it for mass duplication of bodies with the necessary control using the function parameters. It's also useful if we decide that we want to change something that all of these bodies have in common. We can do so by changing the body properties in the function itself and all of the bodies called from the function will update, rather than having to change every one individually.
So as useful as this is, we can go further. I want my functions to be able to create not 1, but several bodies. For this, we're going to have to do something slightly different.
Instead of using return k = which allows us to call the function alongside the bodies of our ship code, we will be using what is called model.bodies which will let us pre-specify our body names using strings.
model.bodies['bodyName' + n] =
Note that I've also included + n for this case, it's important that we avoid duplicate names because the code cannot differentiate 2 different objects with the same name, even with different properties. So the best solution for this is to number these bodies by adding n in the function parameters. This will let us manually number them, but we still need to be careful that we don't end up with duplicate numbers. This becomes especially important when we get to loop functions.
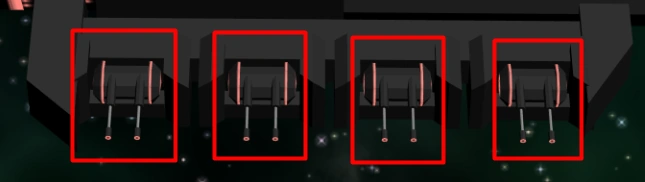
I want to put turrets on my ships. So lets do that using a 3 body function.
addDualGun = (n, xpos, ypos, zpos, size, angle, dmg, rt, spd, nmbr) ->
  model.bodies['quadTurret'+n] =
    section_segments: 8
    offset:
      x: xpos
      y: ypos
      z: zpos
    position:
      x: [0,0,0,0,0,0,0,0,0,0].mult(size)
      y: [-22,-21,-16,-14,-14,14,14,16,21,22].mult(size)
      z: [0,0,0,0,0,0,0,0,0,0].mult(size)
    width: [0,10,15,15,12,12,15,15,10,0].mult(size)
    height: [0,6,12,12,9,9,12,12,6,0].mult(size)
    texture: [17,4,17,4,4,4,17,4,17]
    vertical: false
    angle: 90+angle
  model.bodies['gunBarrel1'+n] =
    section_segments: 8
    offset:
      x: xpos
      y: ypos
      z: zpos
    position:
      x: [0,0,0,0,0,0,0,0].add(-9*size)
      y: [-50,-50,-43,-43,-25,-25,0,0].mult(size)
      z: [0,0,0,0,0,0,0,0].add(6*size)
    width: [0,2,2,1,1,3,3,0].mult(size)
    height: [0,2,2,1,1,3,3,0].mult(size)
    texture: [17,4,4,2,4,4,4]
    angle: angle
    laser:
      damage: dmg
      rate: rt
      speed: spd
      number: nmbr
  model.bodies['gunBarrel3'+n] =
    section_segments: 8
    offset:
      x: xpos
      y: ypos
      z: zpos
    position:
      x: [0,0,0,0,0,0,0,0].add(9*size)
      y: [-50,-50,-43,-43,-25,-25,0,0].mult(size)
      z: [0,0,0,0,0,0,0,0].add(6*size)
    width: [0,2,2,1,1,3,3,0].mult(size)
    height: [0,2,2,1,1,3,3,0].mult(size)
    texture: [17,4,4,2,4,4,4]
    angle: angle
    laser:
      damage: dmg
      rate: rt
      speed: spd
      number: nmbr
To call this function, rather than call it under bodies in our ship code, we instead have to call it after our ship code.
addDualGun(0,50,0,0,1,-90,[8,12],2,[120,150],1)
return model;
We can take this to extremes as we see fit, however I cannot stress enough the importance of keeping code like this optimised as much as possible. Highly detailed, 1 pixel in game is absolutely unnecessary and only wastes server resources. In other words, be careful when calling a lot of functions like this. The poly-count adds up faster than you think.
for-loops[ | ]
for loops allow you to iterate over bits of code. Essentially, it generates an array.
You can use it like this for specific numbers
for i in [0,-18,16,50+x,-75*y]
But the most useful way is to use it like this
for i in [0..8] # this will generate [0,1,2,3,4,5,6,7,8]
for i in [0...8] # this will generate [0,1,2,3,4,5,6,7]
2 dots will generate the array between the 2 values, including both values. 3 dots will generate the array but without the last number.
You can also use it like this for multiples of 2
for i in [0..8] by 2 # this will generate [0,2,4,6,8]
for i in [0...8] by 2 # this will generate [0,2,4,6]
for i in [0..7] by 2 # this will still generate [0,2,4,6] because 7 is outside the possible integers by 2
For our case, we will be using for loops to iterate over bodies, again using model.bodies. The previous image example showing our turrets from our function was actually using a for loop.
for i in [0...4]
  model.bodies['sideBits'+i] =
    section_segments: [45,135,225,315]
    offset:
      x: 93
      y: i*43-49
      z: -12
    position:
      x: [0,0,0,0,6,6,0,0,0,0].mult(0.8)
      y: [-25,-25,-20,-15,-15,15,15,20,25,25].mult(0.8)
      z: [0,-2,0,0,-8,-8,0,0,-2,0].mult(0.8)
    width: [0,18,18,12,5,5,12,18,18,0].mult(0.8)
    height: [0,17,20,20,6,6,20,20,17,0].mult(0.8)
    texture: [4]
    angle: 0
  addDualGun(i,96,i*43-49,-10,0.5,-90,[8,12],2,[120,150],1)
Notice how i is used and multiplied to spread their distances. And yes, it's entirely possible to use loops to iterate over laser properties.
Here's another example where we generate an array of cubes
for i in [0..10]
  model.bodies['emitter'+i] =
    section_segments: [45,135,225,315]
    offset:
      x: i*100
      y: 0
      z: 0
    position:
      x: [0,0,0,0]
      y: [-2,-2,2,2]
      z: [0,0,0,0]
    width: [0,3,3,0]
    height: [0,3,3,0]
    texture: [0]

Oh and did I mention we can nest loops to generate a grid?
for i in [0..10]
  for j in [-10..10]
    model.bodies['emitter'+i+'node'+j] =
      section_segments: [45,135,225,315]
      offset:
        x: i*100
        y: j*100
        z: 0
      position:
        x: [0,0,0,0]
        y: [-2,-2,2,2]
        z: [0,0,0,0]
      width: [0,3,3,0]
      height: [0,3,3,0]
      texture: [0]
Oh, no. We're not done yet.
for i in [0..10]
  for j in [-10..10]
    for k in [-10..10]
      model.bodies['emitter'+i+'node'+j+'height'+k] =
        section_segments: [45,135,225,315]
        offset:
          x: i*100
          y: j*100
          z: k*100
        position:
          x: [0,0,0,0]
          y: [-2,-2,2,2]
          z: [0,0,0,0]
        width: [0,3,3,0]
        height: [0,3,3,0]
        texture: [0]
        laser:     # because I can
          damage: [2000,2000]
          rate: 0.0166666666666666666666667
          speed: [100,100]
          number: 16
          angle: 360-(360/16)
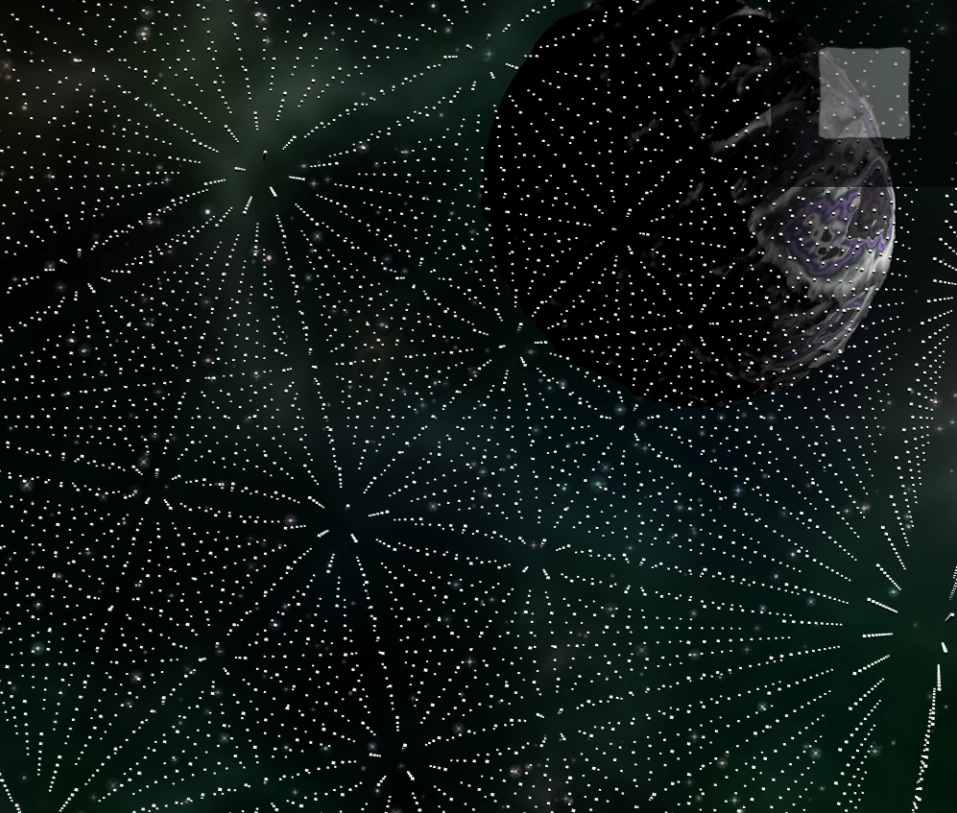
Alright that's enough madness. But seriously though, be careful when trying this, it will most likely lag.
Conclusion[ | ]
There's just one final note I would like to put out there. The ship editor was never expected/meant to be used to such an advanced level, so to those programmers out there who are feeling creative, don't expect much as the ship editor comes as it is. Everything here uses the same fundamentals as the original tutorial, just in a different way that takes off a good amount of manual work. The most important thing to remember in ship building is to remain open and creative. Highly detailed ships are good and all, but don't go overboard with bodies. Make good use of the available textures, as limited as they may be, because they compensate for large, flat areas that lack detail. It's completely fine to use several bodies to construct a detailed part of a ship. Just make sure they're not just a pixel big in game, otherwise they become unnoticed and obsolete.
But most importantly of all, experiment, have fun and create complete garbage ships. Because that's how you will learn and improve. The ship editor is more than just capable of building ships, which the most talented ship builders Finalizer & Goldman & Uranus have proven.
See Also[ | ]
Tutorials[ | ]
Tools[ | ]
- Ship Editor
- Mod Editor
- Map Editor (by community)